Using Kubernetes Deployments for Updating SQL Server
In Kubernetes we can leverage Controllers to help manage our application state, keeping them in the desired state. In this blog post, we’re going to look at how to use a Deployment Controller to manage the application state of SQL Server in Kubernetes. We’ll look at deploying SQL Server in a Deployment and using that deployment to upgrade SQL Server and rollback our upgrade.
Deploying SQL Server in a Deployment
Let’s start off with deploying SQL Server in Kubernetes. We can do that with the following YAML file to describe our Deployment.
apiVersion: apps/v1beta1 kind: Deployment metadata: name: mssql-deployment spec: replicas: 1 strategy: type: Recreate template: metadata: labels: app: mssql spec: containers: - name: mssql image: ‘mcr.microsoft.com/mssql/server:2017-CU11-ubuntu’ ports: - containerPort: 1433 env: - name: ACCEPT_EULA value: “Y” - name: SA_PASSWORD valueFrom: secretKeyRef: name: mssql key: SA_PASSWORD volumeMounts: - name: mssqldb mountPath: /var/opt/mssql volumes: - name: mssqldb persistentVolumeClaim: claimName: pvc-sql-data
apiVersion: v1 kind: Service metadata: name: mssql-deployment spec: selector: app: mssql ports: - protocol: TCP port: 31433 targetPort: 1433 type: NodePort
Listing 1: deployment-sql.yaml
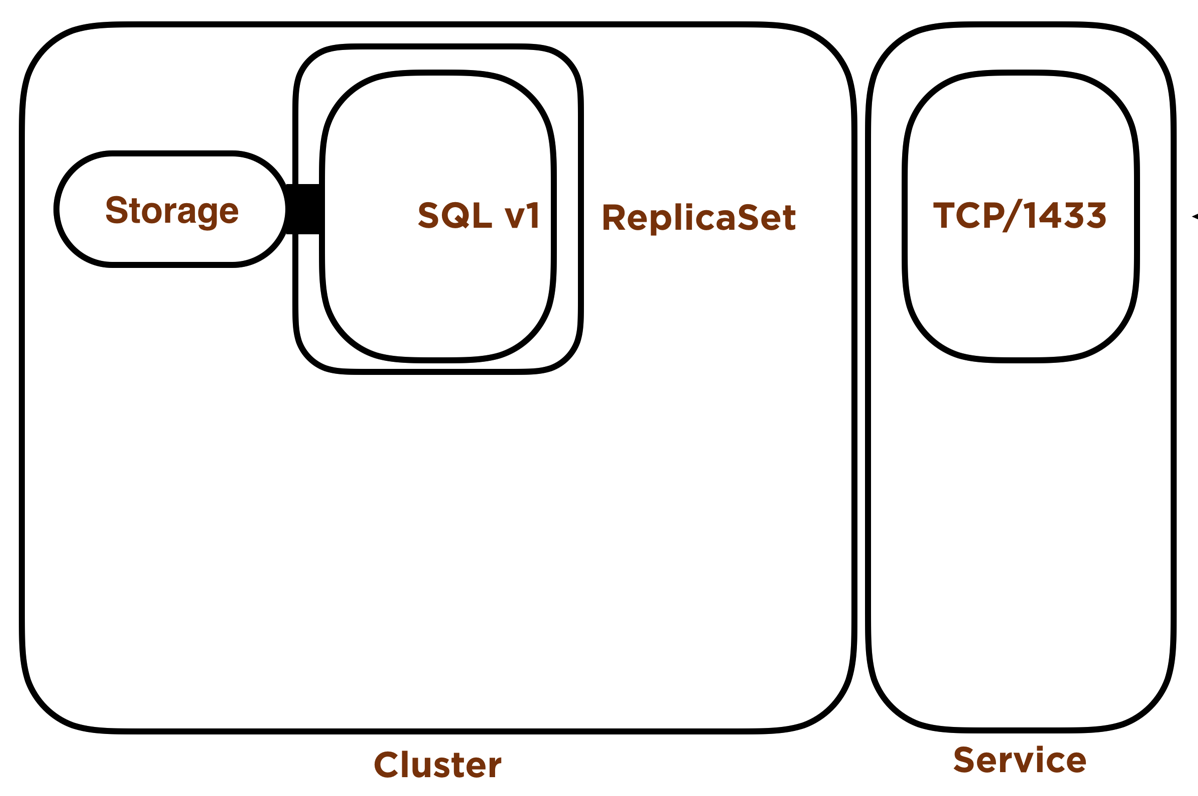
There are a few things I want to point out in our YAML file. First, we’re using a Deployment Controller. This will implement a Replica Set of the desired number of replicas using the container imaged defined. In this case, we’ll have 1 replica using the SQL Server 2017 CU11 Image. A Replica Set will guarantee that a defined set of Pods are running at any given time, here we’ll have exactly one Pod. We’re using a Deployment Controller, which gives us move between versions of Replica Sets based off different container images in a controlled fashion…more on that in a second. I would also like to point out, the volume described in this manifest. Our container’s data directory is /var/opt/mssql which is mounted on a PersistentVolumeClaim. This means our data is external to our Pod, if our Pod is redeployed our databases will be in this directory, they will be mounted and our databases will be made available. We’re also using a Service to provide a fixed IP and Port for access to our SQL Server in this Deployment.
Let’s go ahead and apply the code in Listing 1: deployment-sql.yaml
kubectl create secret generic mssql --from-literal=SA_PASSWORD=OurR&4llyStr0ngP4ssw0rd!
kubectl apply -f deployment-sql.yaml --record
With that applied, our SQL Server Deployment will schedule one Pod, start up the container, expose it as a NodePort Service and our SQL Server is up and running on the 2017 CU11 container image. That **–record** flag will record the operation as an annotation on the resource. Basically giving us some human-readable information about what we’re doing with that command that we can user later.
Deployments and Replica Sets
In Kubernetes, Deployments are made of Replica Sets. With our SQL Server Pod up in running from our Deployment, let’s start our investigation using **kubectl get deployment mssql-deployment**. In the output below, we can see the deployment **mssql-deployment** started a Replica Set based off of the SQL Server 2017 CU11 Image. And the Replica Set started for that container image is **mssql-deployment-55bd89b84d**.
kubectl get deployment mssql-deployment<br /><br />Name:               mssql-deployment
…output omitted<br />Pod Template:<br />  Containers:<br />   mssql:<br />    Image:      mcr.microsoft.com/mssql/server:2017-CU11-ubuntu<br />…output omitted<br />NewReplicaSet:   mssql-deployment-55bd89b84d (1/1 replicas created)<br />Events:<br />  Type    Reason             Age    From                   Message<br />  ----    ------             ----   ----                   -------<br />  Normal  ScalingReplicaSet  7m10s  deployment-controller  Scaled up replica set mssql-deployment-55bd89b84d to 1
##
Figure 1: SQL Server Deployment
Updating the Deployment with a New Container Image
Now we can use Deployments to easily move between versions of container images. So let’s update this 2017 CU11 container image with a 2017 CU12 container image. We can do that with this code:
kubectl –record deployment set image mssql-deployment mssql=mcr.microsoft.com/mssql/server:2017-CU12-ubuntu
With this block of code, we’re recording the updating of the container image with –record and we’re setting the container image for the mssql container in our Pod Template to 2017-CU12-ubuntu.
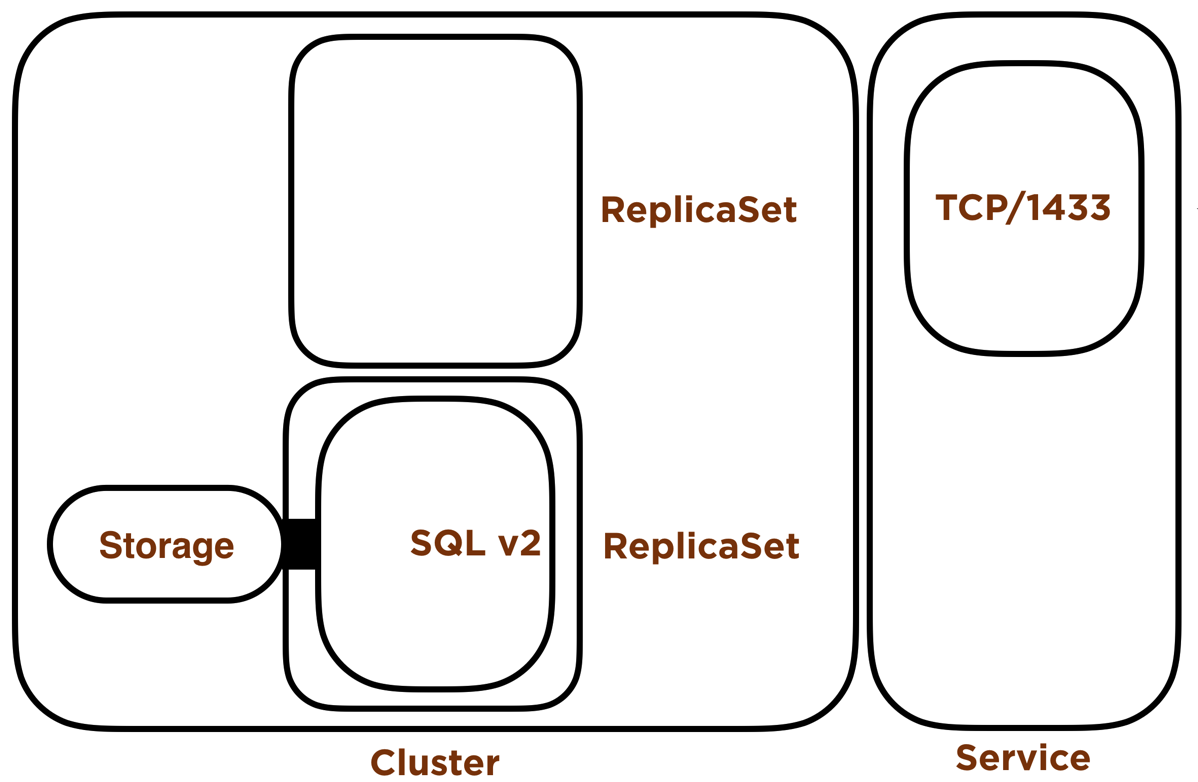
Now our container image is being updated using our defined Update Strategy…we defined our update strategy way back in **deployment-sql.yaml** with the attribute **strategy: type: Recreate**. The Recreate update strategy will shut down the existing Pod(s) in the Replica Set before starting the new Pod(s) with the new container image in the new Replica Set we’re updating to. This makes sense in an RDBMS since we want to have only one Pod have access to the data files at one point in time. This entire process takes only a few seconds! You may have to wait while SQL Server runs update scripts on the databases.We can check the status with **kubectl rollout status deployment mssql-deployment**
kubectl rollout status deployment mssql-deployment<br /><br />Waiting for deployment "mssql-deployment" rollout to finish: 0 out of 1 new replicas have been updated...
Waiting for deployment "mssql-deployment" rollout to finish: 0 of 1 updated replicas are available...
deployment "mssql-deployment" successfully rolled out
Now look more closely at our Deployment again with **kubectl describe deployment mssql-deployment**. In the output below, here we see the original Replica Set (**mssql-deployment-55bd89b84d**) scaled from 1 to 0 and our new Replica Set (**mssql-deployment-6776c966b7**) based off of the CU12 image scaled from 0 to 1. I also want to point out that Kubernetes will keep the original Replica Set metadata around for us which we can use to rollback if needed.
kubectl describe deployment mssql-deployment<br /><br />Name:               mssql-deployment
…output omitted
Pod Template:
  Containers:
   mssql:
    Image:      mcr.microsoft.com/mssql/server:2017-CU12-ubuntu<br />…output omitted<br />NewReplicaSet:   mssql-deployment-6776c966b7 (1/1 replicas created)
Events:
  Type    Reason             Age   From                   Message
  ----    ------             ----  ----                   -------
  Normal  ScalingReplicaSet  15m   deployment-controller  Scaled up replica set mssql-deployment-55bd89b84d to 1
  Normal  ScalingReplicaSet  114s  deployment-controller  Scaled down replica set mssql-deployment-55bd89b84d to 0
  Normal  ScalingReplicaSet  109s  deployment-controller  Scaled up replica set mssql-deployment-6776c966b7 to 1

Figure 2: SQL Server Deployment with updated container image
Check out the Revision History
If you want to check the history of your rollouts, with the recorded changes you’ve made, for your Deployment you can use **kubectl rollout history deployment mssql-deployment**
kubectl rollout history deployment mssql-deployment
REVISION CHANGE-CAUSE
1 kubectl apply –filename=deployment-sql.yaml –record=true
2 kubectl deployment set image mssql-deployment mssql=mcr.microsoft.com/mssql/server:2017-CU12-ubuntu –record=true
With this we can see the history of our changes to our Deployment, specifically Revision number 1 when we created our Deployment. Then Revision number 2 when we changed the image from CU11 to CU12.
Rolling Back our SQL Server Deployment to the Previous Container Image
Now, if we needed to rollback from CU12 to CU11, that’s quite easy in Kubernetes, we can do that with **kubectl rollout undo deployment mssql-deployment –to-revision=1 **
kubectl rollout undo deployment mssql-deployment --to-revision=1
Then we can use **kubectl describe deployment mssql-deployment** to check the status of our Deployment rollback.
kubectl describe deployment mssql-deployment<br /><br />Name: mssql-deployment<br />…output omitted<br />Pod Template:<br /> Containers:<br /> mssql:<br /> Image: mcr.microsoft.com/mssql/server:2017-CU11-ubuntu<br />…output omitted<br />NewReplicaSet: mssql-deployment-55bd89b84d (1/1 replicas created)<br />Events:<br /> Type Reason Age From Message<br /> ---- ------ ---- ---- -------<br /> Normal ScalingReplicaSet 7m55s deployment-controller Scaled down replica set mssql-deployment-55bd89b84d to 0<br /> Normal ScalingReplicaSet 7m50s deployment-controller Scaled up replica set mssql-deployment-6776c966b7 to 1<br /> Normal ScalingReplicaSet 18s deployment-controller Scaled down replica set mssql-deployment-6776c966b7 to 0 <br /> Normal ScalingReplicaSet 12s (x2 over 21m) deployment-controller Scaled up replica set mssql-deployment-55bd89b84d to 1
In the output above you can see our updated Replica Set (**mssql-deployment-6776c966b7**) is scaled from 1 to 0 and the original Replica Set is scaled from 0 to 1 (**mssql-deployment-55bd89b84d**). Bringing the Replica Set backed with the CU 11 image back online. Again, similar to the rollout of the image update above, this entire process takes only a few seconds. Again, you may have to wait while SQL Server runs update scripts on the databases.
Summary
Kubernetes offers us many ways to manage our application state. Deployment Controllers give us the ability to easily move between versions of our application and rollback if needed. In SQL Server, this method offers us a way to move between Cumulative Updates in a controlled way with a very quick, and controlled way to rollback if needed. However, in SQL Server, we have to deal with upgrades where we can’t easily roll back as is the case when we update the database version. We can still use this to upgrade SQL Server between database versions, but we lose the ability to rollback. In those scenarios, testing is the best way to ensure you are compatible in the upgraded state. You’ll find this rollout method is amazingly simple and fast when you try it out.
**Please feel free to contact me with any questions regarding Linux, Kubernetes or other SQL Server related issues at: **aen@centinosystems.com